How to layer plants in a border is the single most useful thing you can learn if you want your garden to look intentional rather than accidental. How to layer plants in a border is what separates a planting scheme that looks like a collection of random plants from one that looks like it was designed by someone who knew exactly what they were doing — even if they didn’t. The principle is straightforward, the results are transformative, and once you understand it, you’ll never look at a garden border the same way again.
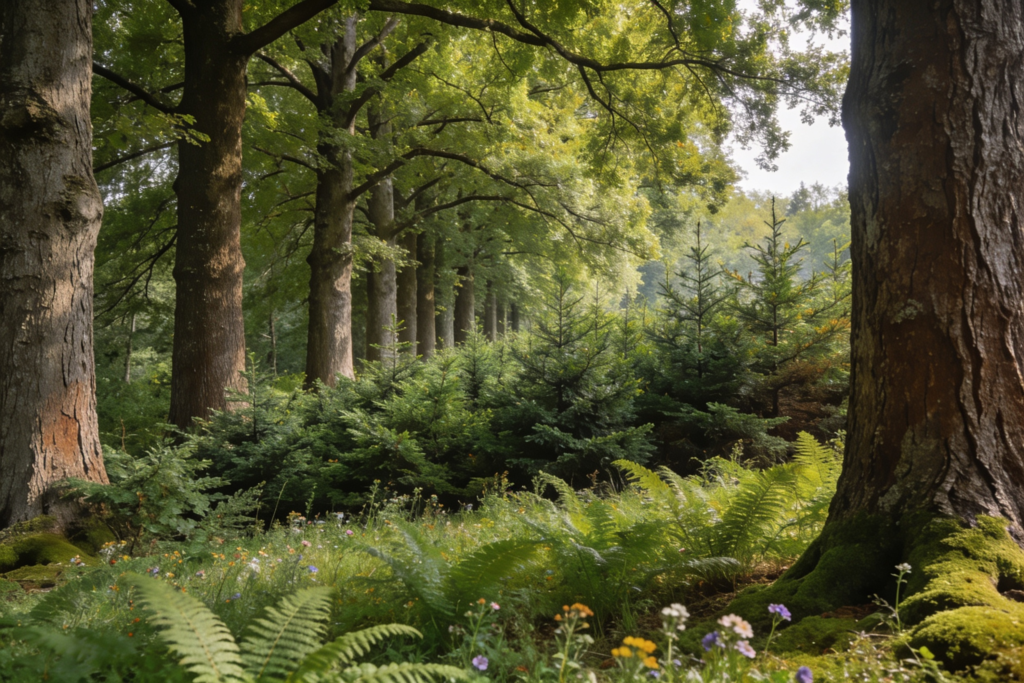
The idea comes from how plants grow in nature. Walk into any woodland edge or hedgerow and you’ll notice that plants naturally arrange themselves in layers: tall trees above, smaller shrubs in the middle, ground-hugging plants at the base. Replicating that structure in a garden border creates visual depth, ensures something is always in flower, and makes the planting feel coherent in a way that’s difficult to achieve by simply dotting plants around at random.
The Three Layers Every Border Needs
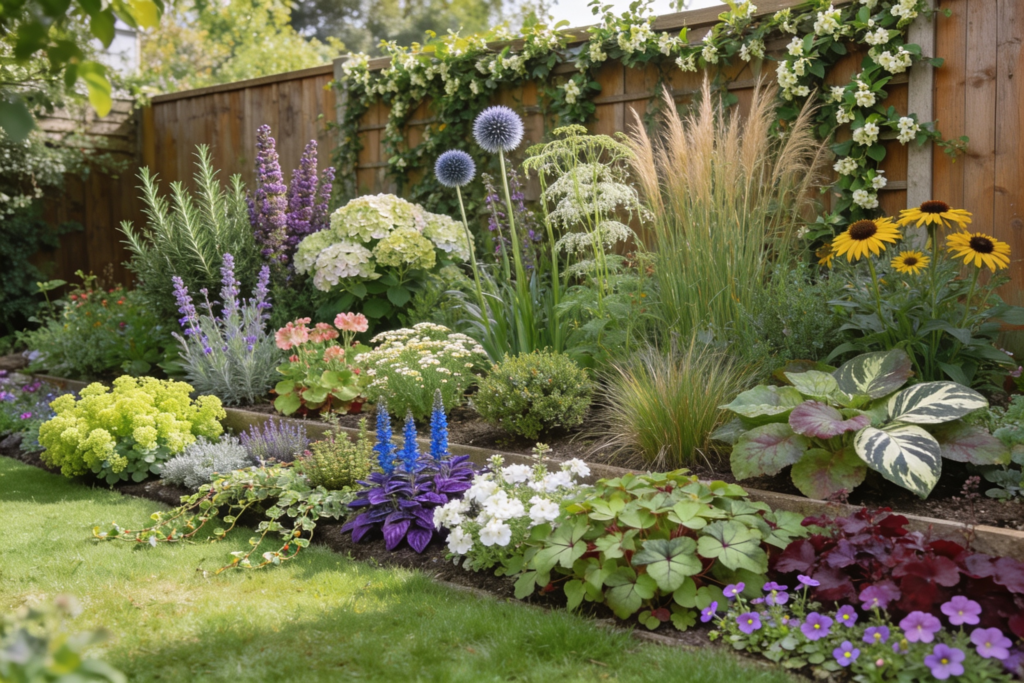
The classic approach divides a border into three height zones: tall plants at the back, medium plants in the middle, and low-growing plants at the front. It sounds almost embarrassingly simple, and in essence it is — but the way you execute it, and the details you get right, is what makes the difference between a border that looks designed and one that just looks busy.
The back layer is where your tallest plants go — anything that will eventually reach 1.2 metres or more. In a UK garden context, this might be shrubs like rosemary, buddleia, or hydrangeas, tall perennials like echinops, rudbeckia, or thalictrum, or ornamental grasses such as miscanthus. If the border backs onto a fence or wall, climbing plants trained against it add another dimension without taking up ground space.
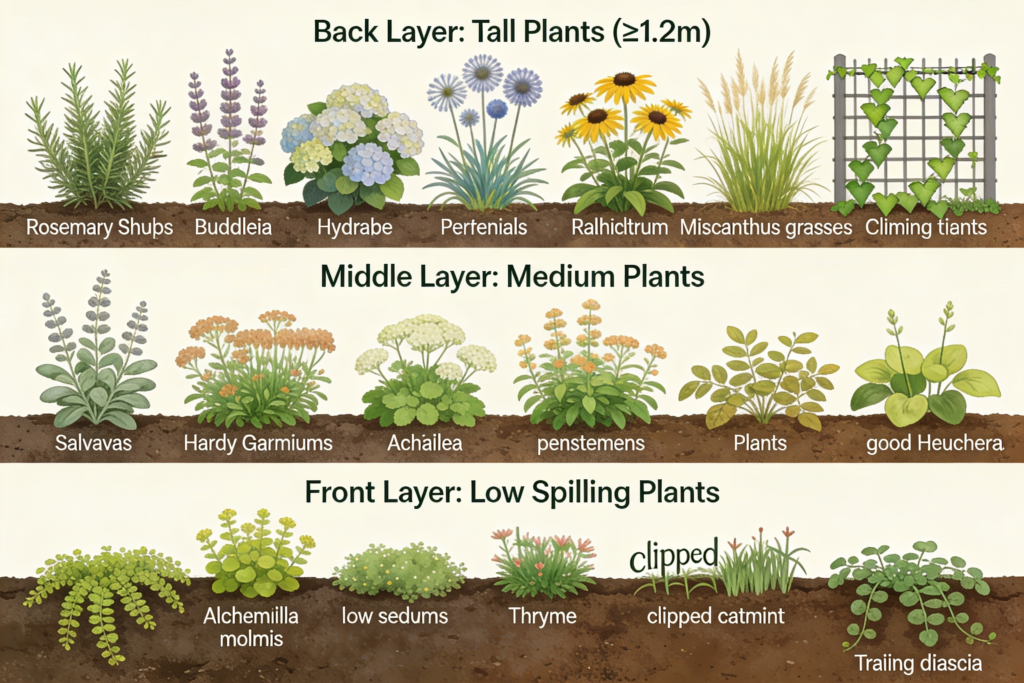
The middle layer is the heart of the border — the zone most people look at when they stand in front of it. Medium-height perennials, smaller shrubs, and compact ornamental grasses work here. Salvias, geraniums (the hardy, perennial kind rather than the bedding pelargoniums), achillea, and penstemons are all excellent mid-border plants for UK gardens. This is also where you place plants with particularly good foliage, because the eye spends most time here.
The front layer is low and spilling. The aim is to soften the edge of the border — plants that tumble forward slightly onto a lawn or path rather than sitting rigidly upright. Alchemilla mollis is the classic front-of-border plant in British gardens for this reason; its frothy lime-green flowers and water-repelling leaves create a soft, generous edge that looks good from May through to autumn. Low sedums, thyme, catmint clipped back after flowering, and trailing diascia all work similarly well.
📖 Also read: How to Grow Lavender in the UK
The Fourth Layer: Ground Cover
Many garden designers add a fourth layer beneath the main planting — true ground cover that suppresses weeds and fills the gaps between larger plants. This is what makes a border look full and lush rather than patchy, and it dramatically reduces maintenance because bare soil is where weeds germinate.
Epimediums are outstanding in this role — tolerant of dry shade, evergreen or semi-evergreen, and available in a range of flower colours from white to deep burgundy. Ajuga reptans (bugle) spreads by runners and produces attractive purple foliage with blue flower spikes in spring. Hardy geraniums, if not already acting as a mid-border plant, will spread to cover ground between taller neighbours. Even sweet violets, allowed to self-seed gently at the base of the border, create a soft carpet of growth that looks naturalistic and keeps weeds at bay.
The rule with ground cover is to plant generously from the start. Sparse ground cover doesn’t work — it just creates a different set of gaps for weeds to fill. Three plants per square metre is a reasonable starting density for most spreading perennials.
How to Plan the Layers: A Practical Approach
You don’t need specialist software or a design degree to plan a layered border. A piece of squared paper, a pencil, and a rough list of what you want to grow is enough.
Start by measuring the border and drawing it to a rough scale — even approximate measurements help. Mark where north is, because this tells you which parts of the border get most sun and which sit in shade for part of the day.
Then work from back to front. Choose your tall background plants first — these are the structural anchors of the scheme. Space them roughly, remembering that most shrubs and perennials spread as they mature. A buddleia planted 60cm from the fence will fill that gap within two seasons.
Add the middle layer next, placing plants in informal drifts rather than individual specimens. Drifts of three, five, or seven plants of the same variety look far more naturalistic than alternating single plants. Odd numbers are a classic design principle because they’re harder for the eye to count and therefore look less regimented.
Fill in the front layer last, running it as a continuous ribbon along the border edge. And then add ground cover to fill remaining gaps.
Thinking About Colour and Season
Layering isn’t only about height — it’s also about timing. A well-planned border has something worth looking at from February through to November, because different layers come into their own at different points in the year.
Early spring belongs to bulbs. Plant tulips, alliums, and camassia through the middle and back layers in autumn — they’ll push up through the emerging perennial growth and provide colour before most of the border has woken up. In a UK garden, snowdrops and hellebores extend this further, providing interest from January onwards.
Late spring and early summer is when the middle layer takes over — hardy geraniums, salvias, and alliums (if you planted the bulbs) come into their own. By midsummer, the tall back-of-border plants are at their peak: echinops, rudbeckia, and taller grasses. And in autumn, sedums, asters, and ornamental grass plumes give the border a final flush before the growing season ends.
The trick is to map out who’s doing what and when before you plant, and to make sure you’re not left with a glorious display in June that collapses into nothing by August. A simple spreadsheet — plant name, flowering time, height, colour — is all you need.
📖 Also read: How to Create a Wildlife-Friendly Garden
Common Mistakes to Avoid
Planting everything at the same height. This is the single most common mistake in UK borders. Even if you follow the back-middle-front rule, variation within each layer adds visual interest. Vary heights by 20–30cm within each zone rather than planting everything at exactly the same level.
Ignoring foliage. Flowers are fleeting; foliage lasts the whole season. In a well-layered border, at least half the plants should be chosen primarily for their leaves rather than their flowers. Bold hostas, silver-leaved stachys, feathery fennel, and strappy phormiums all add texture and structure that holds the planting together even when nothing is in bloom.
Leaving too much bare soil. Bare soil equals weeds. If your plants aren’t touching after the first season, fill the gaps with annuals in the short term and plan to add more ground cover the following autumn.
Over-relying on a single season. Many gardeners plant for summer peak and then wonder why the border looks empty from September onwards. Plan for autumn interest — asters, sedums, rudbeckias, and the seedheads of grasses and alliums — and the border will reward you for months longer.
Making the border too narrow. A border less than a metre deep rarely has enough room to layer properly. The front edge gets crowded, the back plants loom, and there’s no space for the gentle gradient from tall to low that makes the whole thing work. If your border is currently narrow, extending it — even by 30–40cm — makes a disproportionate difference to what you can plant and how good it looks.
A Simple Starter Scheme for a UK Border
If you want a concrete example to get started, here’s a simple layered scheme for a sunny, south-facing border of about 2 metres wide by 4 metres long — the kind of border that’s common in suburban British gardens:
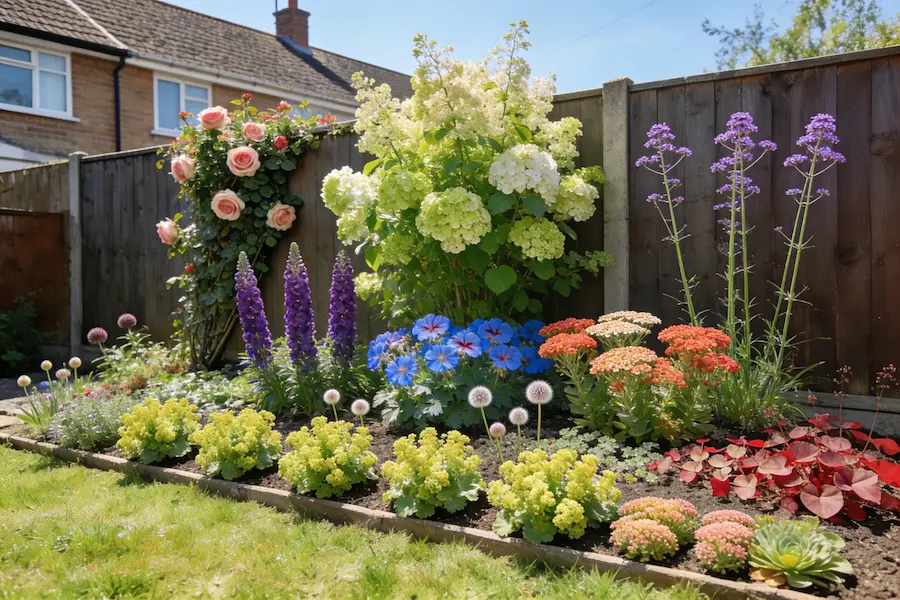
Back layer: One Rosa ‘Gertrude Jekyll’ trained against the fence, one Hydrangea paniculata ‘Limelight’ (which will grow to around 1.5m), and three stems of Verbena bonariensis for airy height.
Middle layer: Three Salvia nemorosa ‘Caradonna’ (deep purple spikes), five hardy Geranium ‘Rozanne’ (long-flowering blue), and three Achillea ‘Terracotta’ for warmth.
Front layer: Five Alchemilla mollis running along the edge, interspersed with three Sedum ‘Matrona’ for late colour.
Ground cover/bulbs: A handful of Allium hollandicum bulbs scattered through the middle layer, and a drift of Epimedium × rubrum filling the shadiest corner.
This scheme costs roughly £60–80 if buying young plants and will look established within two seasons. By the third year it will look like it’s been there forever.
📖 Also read: How to Start an Allotment in the UK
The Bigger Picture
Layering plants in a border is one of those techniques that repays every hour you put into thinking about it before you spend a penny on plants. The biggest gains come not from expensive plants or elaborate maintenance routines but from understanding how height, timing, texture, and scale work together — and then applying that understanding consistently.
The gardens that people stop and stare at on open days in Yorkshire or at National Garden Scheme openings in Surrey are rarely filled with rare or difficult plants. They’re filled with well-chosen, well-placed ones — arranged in layers that create depth, movement, and a sense that the whole thing belongs together. That’s entirely achievable in an ordinary garden, with ordinary plants, by anyone who understands the principle.
Leave a Reply